 Note
NoteBefore installing AhnLab EPP, install CentOS 7. EPP supports CentOS 7.3 and 7.4.
Note
It is recommended to install the latest version of CentOS at the time of the product release.
EPP Server can be installed on CentOS 7.3, 7.4, 7.5 or 7.6 (minimal, normal or full).
OS Type |
Note |
CentOS 7.3 minimal |
|
CentOS 7.4 minimal |
|
CentOS 7.5 minimal |
|
CentOS 7.6 minimal |
Recommended Version |
Install CentOS 7 before installing AhnLab EPP as below:
Download the CentOS 7.6(CentOS-7-x86_64-Minimal-1810.iso) file and make a bootable DVD.
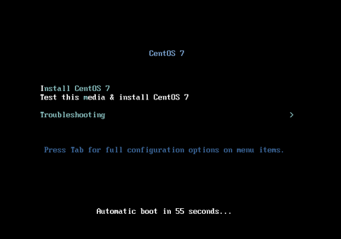
Boot with the DVD and select Install CentOS 7.
Note
For more information about SWAP, please refer to https://access.redhat.com/ko/solutions/744483.
Note
- xfs
is recommended as the file system type.
- If there is an EFI boot partition, you must also create one during manual
setup.
- Some devices need bios boot partition, but it cannot be created using
the steps below,
so an error may occur.
After the installation, the only commands available
to specify network are ip and ethtool.
1) Connect the LAN cable to the server.
2) Check the existing NIC list with ip a command.
ex) Devices such as enp3s0, enp5s0 are displayed.
- NIC with LInk: yes is the currently active device.
3) Open the file with vi (/etc/sysconfig/network-scripts/ifcfg-device
name) and make the following changes:
BOOTPROTO=none
ONBOOT=yes
IPADDR=192.168.100.100
GATEWAY=192.168.100.254
NETMASK=255.255.255.0
4) Use systemctl restart network.service or service network restart command
to restart the network service.
5) If the host name must be changed, create a file with the server name
in /etc/hostname and restart the server.
6) The network setting is complete.